Minecraft Server From Scratch (Proxmox LXC, Docker Compose + itzg)
Table of Contents
Just a smol lil guide for myself to set up a minecraft server from scratch, as I cannot count the number of times I’ve had to re-learn this when I migrate from server to server.
I’ve opted for services that should (for the most part) be supported long-term and are relatively secure & lightweight. However, as any good netizen should do, please take my advice with a granule of sugar…
- Set up LXC Container in Proxmox
- Create new container in
proxmoxusing theUbuntu 24.04LXCimage (or your desired flavour, noting commands may differ slightly depending on package managers) - allocating at least4GB RAM&2-4 CPUcores to the machine. - Once logged in, create a sudo-enabled user with:
adduser myuserSet the password, then:usermod -aG sudo myusersu myuser - Harden SSH - ensuring the following values are changed & set within
/etc/sshd_config.
Port 22
PermitRootLogin no
MaxAuthTries 4
MaxSessions 2

PubkeyAuthentication yes

PasswordAuthentication no
PermitEmptyPasswords no

KbdInteractiveAuthentication no

UsePAM no

X11Forwarding no
PrintMotd no
ClientAliveInterval 600
ClientAliveCountMax 2
- Add your local machine’s
ed25519_pubkey to the~/.ssh/authorized_keysfile (creating it, if it doesn’t exist). This will allow key-based login for usermyuser.
Be careful not to lock yourself out here, test with password based login first! For example, by setting PasswordAuthentication yes and logging in, before changing it to PasswordAuthentication no.
-
Ensure
DNSis setup properly - check/etc/resolv.conf. Basic internet functionality can be tested & achieved by having the linenameserver 8.8.8.8, but configure to your use case. -
Login from local machine with
ssh myuser@XXX.XXX.XXX.XXX. Test your sudo privileges withsudo ls /root. -
Lock root account with
sudo passwd root -l. -
Run
sudo apt update && sudo apt upgrade -y. -
Find the current
IPwithip -a(typically on theethinterface) and set it as static (inproxmoxand/or on your router).
- Install Docker (Compose) & itzg Minecraft Server
-
Install Docker Engine - follow steps (distro-specific) here, as you will need to configure your package repository properly.
-
Install Docker Compose - following steps here.
sudo apt install docker-composeworked for me. -
Make a new directory for the Minecraft server to sit in:
~/minecraft. -
Inside, create a
docker-compose.yml, generated with something like setupmc.com to specify server version, plugins, etc.
My example docker-compose.yml file is below (for a 1.18 server, replacing Timezone (TZ) accordingly):
services:
	mc:
		image: itzg/minecraft-server:java17
		tty: true
		stdin_open: true
		ports:
			- "25565:25565"
		environment:
			EULA: "TRUE"
			TYPE: "PAPER"
			VERSION: "1.18"
			PAPER_CHANNEL: "experimental"
			MEMORY: "4096M"
			MOTD: "welcome, traveller, to an older time...
			USE_AIKAR_FLAGS: "true"
			TZ: "[YOUR-TIMEZONE]"
		volumes:
			- "./data:/data"
-
Start the container from within the same directory as
docker-compose.ymlwithsudo docker compose up -d. After the image is finished being pulled from the itzg minecraft server repo, watch the logs as the server starts withsudo docker compose logs -f. -
If you get an error message about the “class file version” after starting the server, check this table to see which Java version corresponds to the respective class file version. Then adjust the Docker image tag in the setupmc.com](https://setupmc.com/java-server/) configurator accordingly.
-
To stop the server, run
sudo docker compose down. -
To migrate a world save file over (if applicable), copy the following files (at minimum) over from your old server (using something like
scp, or via a GUI if you install something like webmin):server.properties/world/world_the_nether(if exists)/world_the_end(if exists)whitelist.json(if applicable)
Ensure to tweak server-specific configurations within server.properties if needed!
-
As you’re running through
docker, it should handle the local network ports on thelxcfor you nicely (if on a freshlinuxinstall). Also, before I continue, it would be remiss of me to exclude the obligatory ***do this so at your own risk, and please consider the below server hardening methods: -
With that out of the way, now time to open up a port on your local router/modem. For me, I’ve opted for a little “security through obscurity” (a contentious topic, but given my threat model) by mapping my router’s external port,
43456to the default minecraft listening port (25565- specified inserver.properties) on mylxcmachine: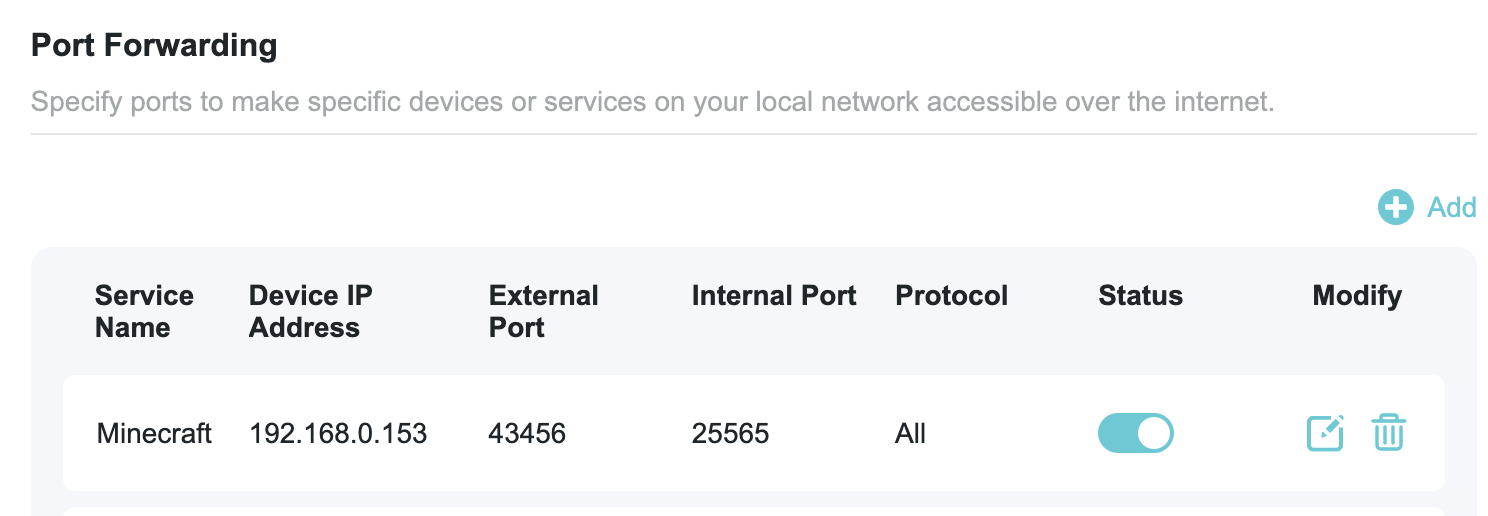 Additionally, I’ve set up a
 DNS A recordfor the domain I own to point at my router’spublic IP, so I can access my server (and share it) withmy-domain:43456.
Now, you should be all up and running! :3